Category: Calligraphy tips & tricks

Mini tutorial 5: Watercolour Monstera leaf

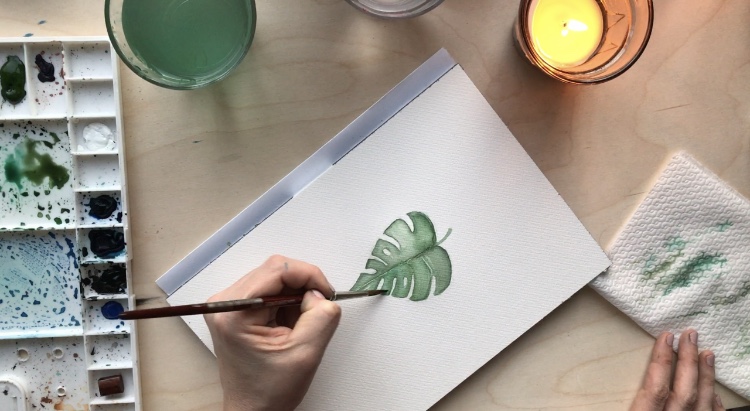
For day 5 we’re watercolouring again. I’m going to show you how to paint a monstera leaf!

Today was such a lovely day, the first official day of spring with the sun out in it’s full glory. The ducks were quacking in the canal outside my house and I was sat at my desk in front of the window enjoying the sunshine.

So I wanted to paint something ‘nature-y’ today. To remind ourselves that even though the world seems on pause right now, everything is still flowing and growing around us and we can still enjoy it, be it from behind a window or in our own gardens.

These are the supplies I used today:

The links above link to Van der Linde, which is one of my favourite creative heavens in Amsterdam and they also deliver!

So I explain everything in the video below, but these are the most important things to remember:
– Use separate cups of water for ‘warm’ and ‘cold’ colours
– The first layer is a really light one without a lot of pigment, but don’t make it too wet because you will see puddles and harsh lines once the water dries
– Mop up excess water with a dry brush, keep a paper towel ready to dry your brush
– Wait for the first layer to dry before adding the darker segments of the leaf
– Make the outside lines dark, then fill in the middle with just a dip of water. Again, mop up excess water with a dry brush

I hope you enjoyed this one. If you haven’t signed up for the tutorials in your mailbox yet then you can do so below. Take care!

Lots of love,


Mini tutorial 4: Life at its most brilliant..

So it’s just a short one today! We’re writing a quote in pointed pen calligraphy from one of my favourite authors Paulo Coelho:

Life always waits for some crisis to occur before revealing itself at its most brilliant’

Sometimes I get emotional thinking about when we make it through this corona crisis. When we can go outside and meet each other again without having to worry, when we can hug friends and family, sit shoulder to shoulder on terraces and drink wine, walk in crowded shopping streets and lay on busy beaches in the sunshine. Everything that we used to take for granted will be brilliant and beautiful.

I didn’t feel up to a full explanation on video today, because there’s a lot of technique that goes into pointed pen calligraphy and it would become a really long video. If you’ve joined one of my workshops before you know how it works and will have all the tools, and this video will just be some inspiration for you 🙂 If you’ve never tried it before and want to learn then I highly encourage you to get the below supplies that are perfect for beginners. And to join one of my workshops once we’re able to have them again!

So these are the supplies:

So basically the most important rule in calligraphy is to always point your nib to the right top hand corner of your paper. And to put no pressure on your nib on an upstroke, and then when you go down you add pressure so that the tines of the nib split and create a thicker line.

f you haven’t signed up for the tutorials in your mailbox yet then you can do so below. Take care!

Lots of love,


Mini tutorial 3: Slow down

For day 3 we’re brush lettering!

I received an email from a business coach I follow this week, in which she shared the following text that really resonated with me.

And the people stayed home. And read books, and listened, and rested, and exercised, and made art, and played games, and learned new ways of being, and were still. And listened more deeply. Some meditated, some prayed, some danced. Some met their shadows. And the people began to think differently.

And the people healed. And, in the absence of people living in ignorant, dangerous, mindless, and heartless ways, the earth began to heal.

And when the danger passed, and the people joined together again, they grieved their losses, and made new choices, and dreamed new images, and created new ways to live and heal the earth fully, as they had been healed.

~Kitty O’Meara

I like these words, because it makes us look at the current corona crisis differently. While this is no doubt a devastating situation with many losses in multiple ways, it’s also a healing one. There’s so much we can learn if we just slow down and take the time. If we stay in, read books, make art and really think about what we want. And there’s so many new business ideas and innovative new ways of connecting that arise because of this! While the actual earth is healing too. There’s fish in the clear canals of Venice, and air pollution went down by 30% in China which will prevent thousands of deaths. As scary as it is, maybe this is a much needed pause that we all need, to heal and grow and be stronger together in the end.

Anyway, that’s why we’re brush lettering the words ‘Slow down’ today. Please find the supplies and instructions below.

So far my thoughts for today. I hope you enjoyed this one and if you haven’t signed up for the tutorials in your mailbox yet then you can do so below. Take care!

Lots of love,


Mini tutorial 2: There’s magic in waiting

So it’s day two of the creative mini tutorials! I hope you all enjoyed the first one and are feeling well and positive.

Today’s tutorial is quite an easy and fun one! We’re going to let the water colour do its magic. The gallery wall in my living room needed some more artworks, so I created a little wet-on-wet water colour artwork. The key to this trick is using very wet water colour on a very wet patch on your paper. I love this little trick because you get really beautiful results with a very simple technique, which can feel really rewarding and motivating as a beginner.

Here’s a few pics of the end result:

And here’s the video in which I explain how to do this. The materials I used are:

When I was making this I realised that sometimes we just need to wait for magic to happen. The unpredictable results of the water colour pigment reacting with the water are what makes this technique so much fun.

I think the unpredictability of it all is what’s really stressful right now, but maybe if we just patiently wait, take care of ourselves and each other, look at the positives and trust in the universe (or whatever you may call it) then magic can happen.

So far my thoughts for today. I hope you enjoyed this one and if you haven’t signed up for the tutorials in your mailbox yet then you can do so below. Take care!

Lots of love,


Mini tutorial 1: This too shall pass

We are living in uncertain and scary times right now.  No one can really tell what will happen in the future, and we’re being bombarded with horror stories from around the world that predict the worst.

I’ve been pretty anxious these past few days, thinking a lot about what’s to come, about loved ones who might be vulnerable and, on a more selfish level, about the way that everyday life will change for quite a while and how everything that I always just took for granted can change within what feels like a second. About how just popping into a bar for a few drinks, going out for dinner or simply just hugging a friend is such a privilege. 

So with being anxious, reading a lot of news and just thinking a lot about things that I can’t control anyway, I decided to get out of my head and create. And I’d like for you to join me. Hopefully it will help you too, to get out of your head and ease the anxiety like it does for me. So as of today (17-3) I will share a mini water colour, calligraphy or brush lettering tutorial every day, on here, through social media and my newsletter. With a little message of hope, positivity and encouragement every day to help keep spirits up as much as I can. Sign up below if you would like to receive the tutorials in your inbox.

So here we go, the first tutorial is a little water colour brush lettering tutorial. I used:

If you’re just getting started with water colour and don’t have any supplies yet: these are definitely the best supplies to use and luckily we can still order things online! Splendith is my webshop of choice to get creative supplies, Judith has all the best stuff and I would love for you to support her little business at a time like this. 

So I’m not really comfortable with talking on video yet, but will try to do so for the next tutorials, haha! For this one I’ll explain in written word 😉 So as you can see in the video:

  • Pressure is everything in brush lettering, just like in modern calligraphy: On an upstroke, don’t put a lot of pressure on your brush and just use the tip of your brush. On downstrokes push the brush down a little more, so you use more of the ‘belly’ of the brush which will create a thicker line.
  • Make sure you have enough water on your brush, wet your brush very well then pick up the pigment from your pallet. As you can see I keep doing this and I wet my brush quite a lot so that it will run over the paper smoothly.
  • Hold your brush in about a 35 degree angle and drag the hairs of your brush over the paper rather than pushing them.

If you’re watching the video with sound on, that’s my dog squeaky barking in her sleep from somewhere around the second L of ‘shall’, haha! She never barks when she’s awake, just in her sleep!I

I hope I’ve inspired you to put brush to paper and just have a little play around with it. If you have any questions or would like to show me your results, leave a comment below, send me an email or comment on my Instagram. I’m always here to help, give advice or just for a chat! I’m convinced that just creating things, getting out of your head into your body and focusing on what’s in front of you helps to remain calm and keep your sanity at a time like this. And remember, this too shall pass. No matter how hopeless or negative a situation seems sometimes, nothing is ever permanent. We will get through this together and the sun will come out again.

Lots of love,